


)


Key Takeaways
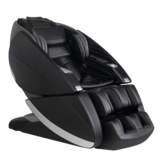
Good day guys, this is the Ultimate Chiro Masseuse Massage Chair.
It’s arrived in your home, now I’m going to show you how to build this massage chair.
First thing is to cut the tape off the box.
We’ve already removed it for the video and then you need to lift the top box off the massage chair.
Probably easier with two people, you can see it’s packaged really well.
It comes a long way and we want to make sure it arrives exactly how it's left our factory.
So basically what you have is the chair and your leg unit.
Pretty amazing foot massager, I’ll just remove that.
You can see separate here, your remote control and power cord.
First thing to do is take all the plastic packaging off then you need to plug it in so that you can actually incline the chair, take it off the cardboard at the bottom and finish the installation.
There’s the remote control and your power cord.
Unravel that and plug it straight in at the back here and the same with the power of the remote control.
It just plugs in, it can only go one way, there’s a slight groove in it.
You’ll hear it beep once you plug it in and you screw on the little washer on the outside as well.
So now, once I hit the on the switch, it’s ready to go.
I’ll incline the massage chair by pressing this back adjustment arrow, as you can see the massage chair sits up.
Looks a bit different because it doesn’t have the foot unit on it but this will allow us, obviously, to finish the installation.
Now you can turn it off and unplug it again, remove the remote control wire from the back and you basically take it off the base of the box.
For the handle at the back here, again you can do it with one person but to be safe have two.
You’ve got a couple of spare fuses in there, hold on to those they might come in handy one day and you’ve also got your butterfly clips to put the foot mechanism on so you’ll need those in a moment.
Now it’s time to install the foot mechanism and that’s the last step basically, you’re away.
So again, taking the plastic off.
There’s a couple of simple things you need to do here, obviously take the foam off there, that’s not required it's just there again for packaging.
There’s a black wire that you just unravel, it’s holding these two in place
There are just two connections, one for the power and one for the air.
They go on very simply to male-female part so you connect either order, doesn’t really matter, slide on the air hose.
You want to get it on there as tight as possible, really easy.
Now on here, you’ve got some basic silver clips, remove those and you’ve also got here your connection that needs to go over the top of this steel rod here.
So it happens on both sides, you put one side on at a time, after tucking away the hose and the cord one side at a time like so.
Takes a little bit of jiggling sometimes to get it on then you need to line up your clips, which again can take a little bit of jiggling but it’s not that difficult to do.
This one is now on, sliding on the clip and this one is now on.
Get it in place so you can see the hole that the clip needs to go into, push it down.
Lift up the chair here, tuck in the velcro like so, that’s it.
Your chair is now built, I’ll plug in the massage chair, reconnect the remote controller, jobs done.
That’s your Ultimate Chiro, it’s going to reduce stress, it’s going to improve your health.
I think it’s time for me to jump in and have a massage.
Have a great day guys.
Summarise Article
Summarise Article